Getting Started
This Quickstart Setup Guide will walk you through automatically populating your streaming scene, as well as automatically conjuring the best OBS settings
Before you get started, you’ll need to download streaming software and the correct Quickstart Setup Pack for your screen’s resolution:
Download and instal streaming software (OBS)
You’ll need streaming software which will enable you to stream on Twitch as well as YouTube. Download the latest version of OBS Studio, a free open source program for streaming and screen recording.
Download your Simple Setup Pack
Download our Simple Setup Pack for the screen you will be streaming.
First, find the resolution of the screen you will be streaming:
Windows screen size
Mac screen size
Available Setup Packs:
Setup Pack for 1280×720
Setup Pack for 1920×1080
Setup Pack for 2560×1440
Setup Pack for 2880×1800 Mac
Setup Pack for 3840×2160 4K
Setup Pack for 4096×2160 4k
Setting up OBS
Once you have OBS installed and the Pack downloaded, it is time to set up OBS. This video tutorial walks you through the steps required:
Step 1: Import and Select the Profile
0:03 – Select ‘Import’ in the ‘Profile’ menu,
0:13 – Open the Profile folder included in the downloaded pack, located here:
/{Downloaded Setup Pack}/OBS/Profile ????x????,
0:16 – Select your imported profile in the ‘Profile’ menu.
Step 2: Import and Select the Overlay
0:18 – Select ‘Import’ in the ‘Scene Collection’ menu,
0:27 – Open the ‘Overlay RIOP.json’ included in the downloaded pack, located here:
/{Downloaded Setup Pack}/OBS/Overlay RIOP.json,
0:31 – Select the ‘RIOP’ Scence Collection in the ‘Scence Collection’ menu.
Step 3: Connect all Sources
Connect each Source in the list to the appropriate sources – double click on each source to edit:
Image sources
- ‘Background’ = /{Downloaded Setup Pack}/Overlay Images/Background.png
- ‘Overlay’ = /{Downloaded Setup Pack}/Overlay Images/Overlay.png
Text sources
- ‘Name’
- ‘Social Slot 01’ = Enter any of your Social usernames
- ‘Social Slot 01 icon’ = Select the correct icon from the ‘Overlay Images’ folder i.e. ico_twitter.png
- ..we setup 3 slots for your social usernames (all optional)
Webcam, Mic and screen sources
- Webcam = Select your Webcam from the ‘Device’ dropdown menu.
- Microphone = Select your microphone from the ‘Device’ dropdown menu.
- ‘Your Screen to Stream’ (hidden whilst we set up) = Select the screen you will be steaming from the ‘Display’ dropdown menu.
Other sources (no setup required)
- Ad Slot = We will serve our latest adverts here.
- streamR badge (mandatory) = We will serve your streamR badge here – expect to update this when you level up (we’ll send you details).
Connecting your Twitch or YouTube
You will need to retrieve a ‘Stream Key’ from the platform you intend to stream from. Follow these instructions, based on the platform/s you will be streaming:
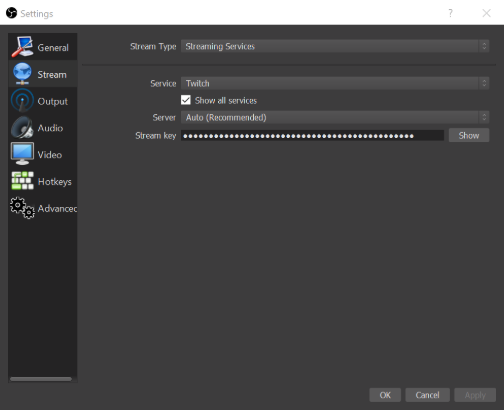
Every user on twitch has a unique “stream key”. A stream key allows users to stream to a specific Twitch account. Do not share your stream key with anyone, because anyone who has your stream key will be able to stream to your Twitch account. Follow these steps:
- Click the following link: https://www.twitch.tv/dashboard/settings – Your Stream Key preferences will be at the top,
- Copy your Stream Key,
- Go to your settings menu in OBS,
- Click on “Stream” in the left sidebar,
- Set “Service” to “Twitch”,
- Paste your stream key in the box next to “Stream key”.

If you’re planning to stream on YouTube, we need to get your YouTube stream key. Follow these steps:
- Click the following link: https://www.youtube.com/live_dashboard?o=U – You will find your “Stream Key” under the “Encoder Setup”,
- Copy your Stream Key,
- Go to your settings menu in OBS,
- Click on “Stream” in the left sidebar.
- Set “Service” to “YouTube / YouTube Gaming”
- Paste your stream key in the box next to “Stream key”.

Congrats! 🎉 You are set and ready.
Next Step
Check our streamR requirements to ensure you meet our minimum requirements.
View our streamR Requirements
Related FAQs
With so many different devices and screen sizes/resolutions out there, we tried our best to cover the most popular ones. Feel free to message on Discord with your resolution and we’ll make sure to add it to our list.
This is a known OBS bug related to Browser sources. Switching to another scene such as the “Quickbreak” scene or an empty scene, and then switching back should fix this.
Make sure you’ve downloaded the correct setup files for your resolution. If the issue persists, please make sure that the tool you’re using to check your screen’s resolution is accurate. To be thorough, you might want to look at the specs of your device/monitor on the manufacturer’s website.
Make sure you have the latest version of OBS Studio installed, you can download it form here: https://obsproject.com
A 4-6 minutes delay is recommended when streaming poker. This is to ensure that other players do not gain an advantage by viewing your cards in real-time, if they happen to be at the same table as you. You can customise the delay from your OBS settings, we’ve covered this topic in our advanced tutorials, #3: Configuring OBS for optimal streaming.
Yes. We have broken down the steps needed to get set up here in our Manual Setup Tutorials
streamR Help Articles
- Overview
- Quickstart Setup (you are here)
- Manual Setup Tutorials
- Requirements
- Reporting Your Hours
- Join our streamR Discord
